CyberLink PhotoDirector 365 is available for Mac and PC, but this review will look at the Mac version. You might be surprised at what it offers, so read on to see what features it has.
What is CyberLink PhotoDirector 365?
PhotoDirector 365 is a full photo-editing suite marketed to hobbyist photographers. It is aimed at the same audience as Adobe Photoshop Elements. CyberLink created this program to cater to beginners. But some features make it an attractive alternative for more advanced photographers. PhotoDirector 365 includes basic photo editing tools and uses layers like Photoshop. Like Lightroom, PhotoDirector 365 is a non-destructive editing program. The program does not change your original file. The program also has a fully functioning Digital Asset Management (DAM) system. This lets you organize thousands of images using keywords and a rating system. One of the new features of the recent update is the integration with Shutterstock. Royalty-free images are available for download directly into your document. With one click, you can select a sky replacement or add a person or object. PhotoDirector 365 is part of a collection of editing programs developed by CyberLink. The company’s primary focus is on Windows products. But PowerDirector, CyberLink’s powerful video editing program, is also available for Mac. We’ll look at how PhotoDirector 365 compares with Adobe’s Lightroom throughout the article.
Key Features in User Interface
When first opening the program, you have the option of express or full mode. Express mode opens one photo. Its workspace includes Preset, Express Layer Template, and AI Style Transfer menus. These are popular one-click edits that quickly change the look of your image. But we will review full mode in this article. Opening full mode, you are shown six modules. These are Library, Adjustment, Guided, Create, Edit, and Print. The modules are across the top of the workspace. Selecting a module opens a control panel in the left column:
Library module helps you organize images and enter metadata. Adjustment module is for standard image editing. Guided module contains many of the special effects included in the program Create module overlaps somewhat with the Guided module. But it also consists of some of the more advanced tools. These let you create GIFs and other video-based products. Edit module works with layers for advanced photo editing. Print module is like Lightroom’s Print module.
Library Module
As mentioned, CyberLink PhotoDirector 365 has a fully realised digital asset management (DAM) system. The Library module includes two tabs:
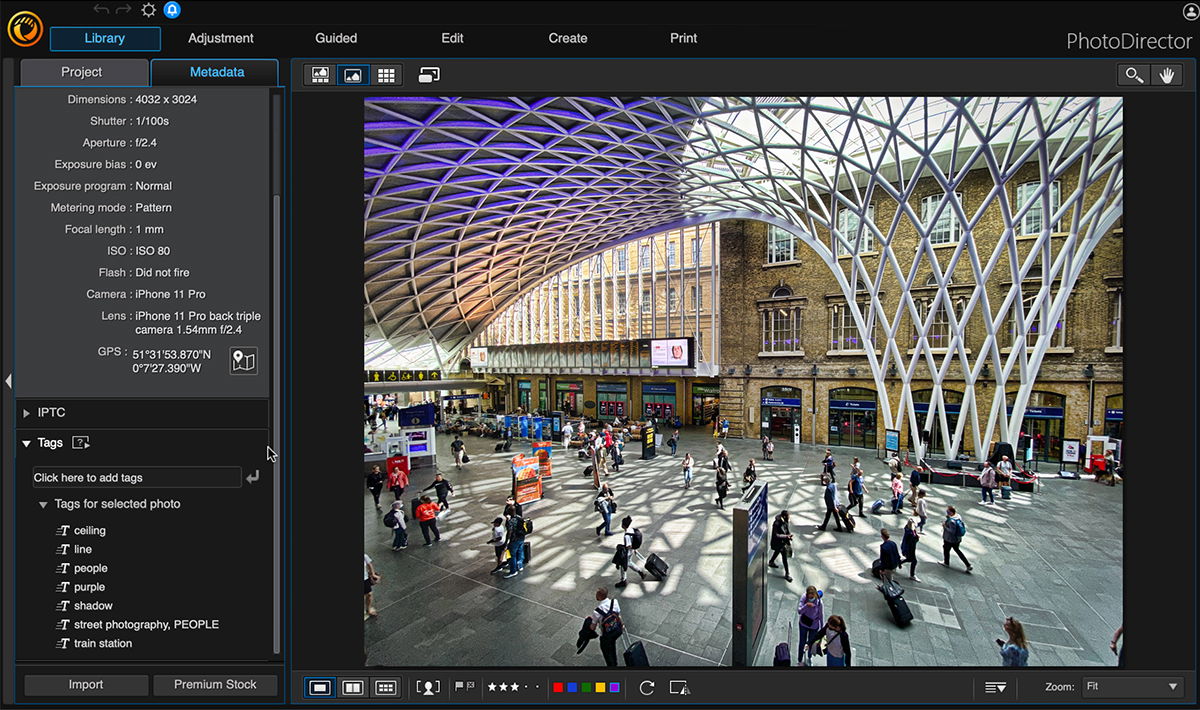
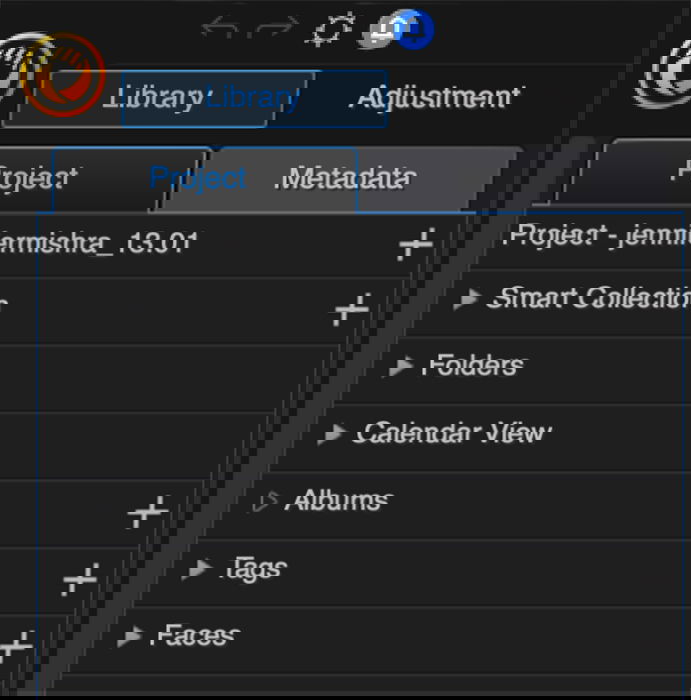
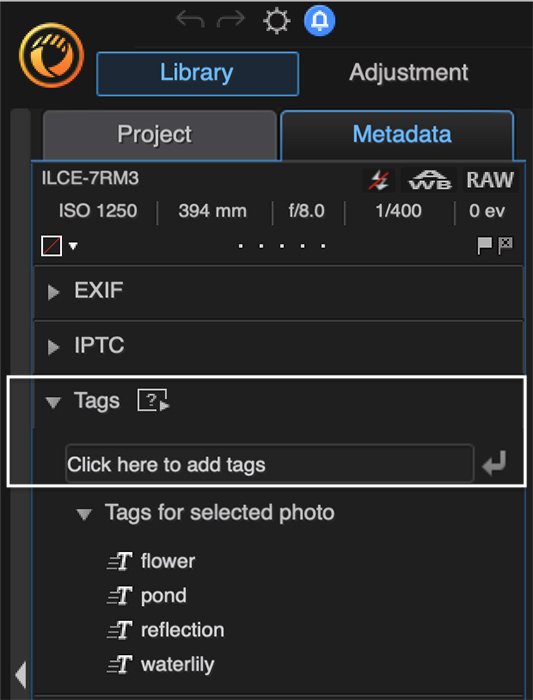
The Project tab is the photo management system. It helps you organize and find images with options like Smart Collections, Folders, Albums, and Tags. The Metadata tab has basic camera settings listed across the top of the column.
The Library module is similar in content to Lightroom. It contains the tools you need to organize and sort your images.
Importing and Organizing Images
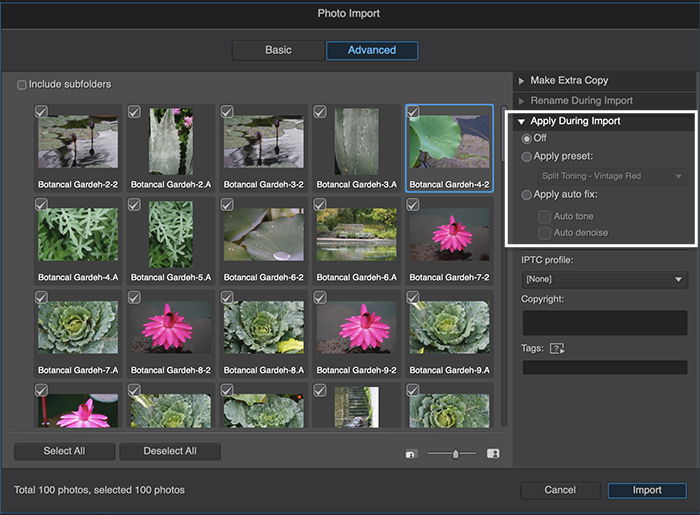
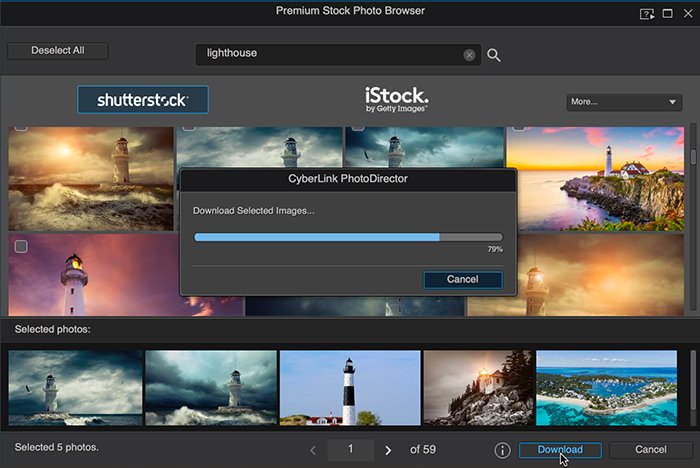
The import feature works like the one in Lightroom. Import is quick. But as with Lightroom, images can be slow to initially render. After the loading spinner disappears, it might be a full two seconds before the photo is resolved. It reads many different file types, including raw files. The Advanced option lets you add metadata or presets to the imported images. You can make an extra copy, rename the image, and add copyright. You can also apply an auto fix for tone and denoise. Facial recognition is a big thing. CyberLink is one of the top companies in facial recognition technology. Added to this version is AI face tagging. It quickly finds familiar faces. Facial recognition has improved greatly from the previous Mac version. But it is not yet up to the level of the Windows version. We tried to autodetect faces, but with little success. Premium stock photography is one of the newest additions to PhotoDirector 365. Instead of importing your own images, download directly from Shutterstock or iStock into your project. These images appear alongside your own. They are indistinguishable from photos imported from a camera. This addition makes PhotoDirector 365 more attractive to designers. But it may not be as useful for photographers. Flags, ratings, and color codes help you sort and cull your images. Select the best for editing and mark others for deletion. Hotkeys speed up the process. But I could find no way to auto-advance photos, which slows down the selection process. Once you have flagged images, you can sort them using various filters. They help to sort pictures by camera and lens. Or you can organize photos by settings like shutter speed or a rating.
Collections and Metadata
CyberLink PhotoDirector 365 automatically sorts your images into Smart Collections. These include the latest imports and recently edited photos. You can also create your own smart collections or albums. Faces recognised by AI from other imports are organised into separate collections. A separate tab houses metadata. You can quickly see EXIF data and add IPTC information and tags. Adding tags was a bit slow, as you must click the enter icon following each entry. I could not find a way to add many tags quickly.
Adjustment Module
The Adjustment module is like photo editing in Lightroom. It includes basic color and tonal correction tools. Like Lightroom, these are general photo edits rather than advanced photo-manipulation tools. The editing tools are similar to those found in Lightroom’s Develop module. But there are a few tools unique to PhotoDirector 365.
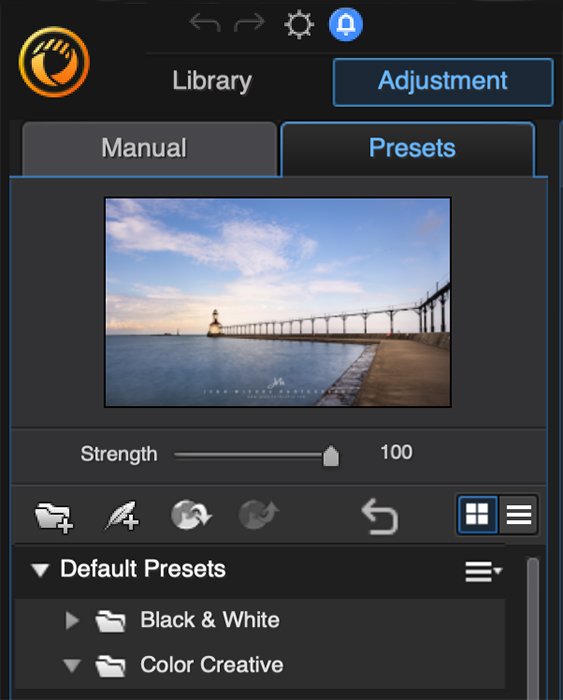
Presets
You can choose to work with presets or manually adjust settings. There are more than fifty presets preloaded under the Preset tab. These quickly change the look of your photo. But you can personalise the preset by switching to the Manual tab to adjust settings. You can also create your own presets. Or you can download presets from the DirectorZone, a community of CyberLink users.
Regional and Global Adjustment Tools
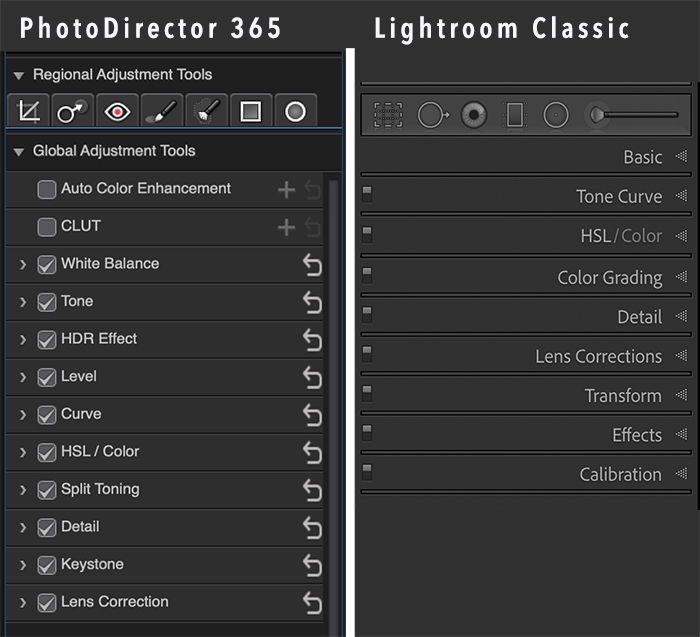
Lightroom users will feel right at home in the Manual section of adjustments. A histogram tops the column. It’s followed by Regional Adjustment Tools (icons) like cropping, spot healing, and brush tools. PhotoDirector 365 also includes a Selection tool. This works much like the Selection tool in Photoshop. It lets you click and drag over segments to select. Let’s look at the list of Global Adjustment Tools:
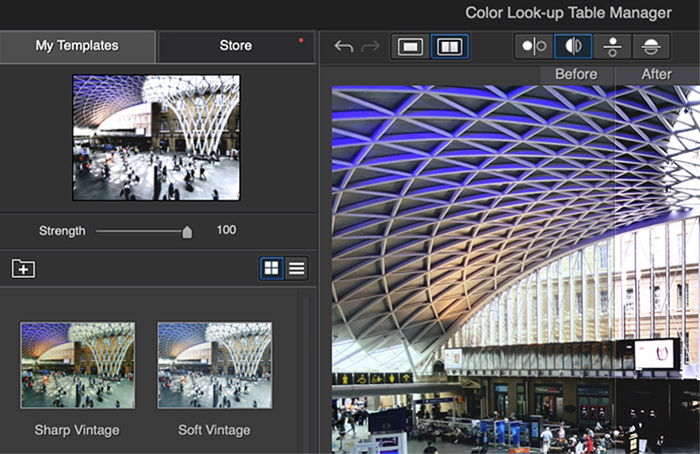
Auto Color Enhancement is a new feature. This AI tool clarifies colors in your image. A before and after feature lets you see what has changed. You can adjust the amount of color enhancement with a slider. But you do not have any other control over the effect. CLUT is the next tool. The acronym may be unfamiliar to Adobe users. It stands for Color Look-up Table manager. CLUT templates transform the colors in your image. The results are similar to a preset with split-toning. A little confusingly, the term used for the different looks is ‘template’. This may be to distinguish CLUT from presets.
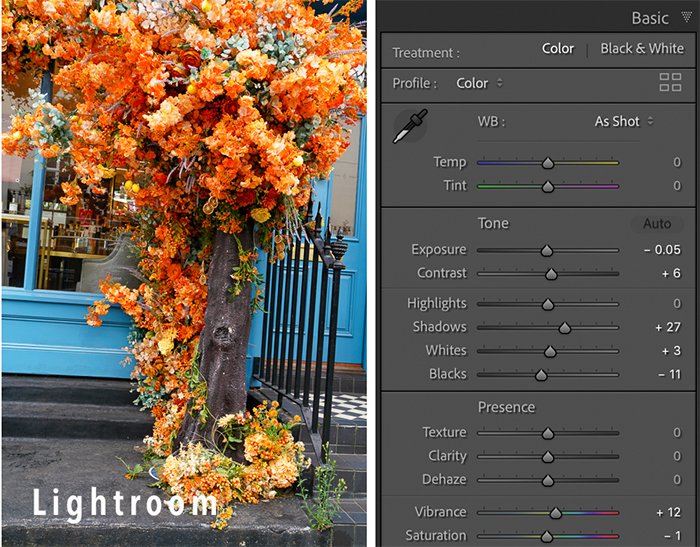
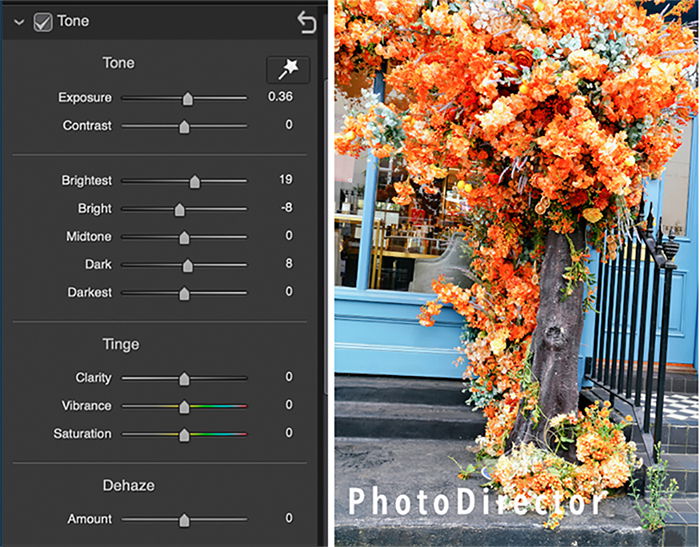
White Balance and Tone follow. The Tone panel is like the Basic panel in Lightroom. It includes sliders that control exposure, contrast, and overall color saturation. PhotoDirector 365 includes a midtone exposure slider not included in Lightroom. Labelling is a bit different. Whites are ‘brightest’ and blacks are ‘darkest’. Also included are clarity, vibrance, saturation, and dehaze, most under the Tinge heading. The HDR Effect panel is for photographers who like the HDR look. You can control glow and edge detail giving you an HDR look with one image. PhotoDirector 365 gives you a choice to use a Level and a Curve panel. These work like tools of the same name in Photoshop. The HSL panel works like the panel of the same name in Lightroom. You can adjust the hue, saturation, and luminance (HSL) of individual colors. The Split Toning panel gives you a choice. You can add color to the highlights and shadows. The three-way split toning option adds a midtone adjustment. The two-way adjustment is simplified. It is like split toning in Lightroom before Adobe introduced the Color Grading panel. The three-way option uses color wheels like the current version of Lightroom.
The Detail panel controls sharpness and noise reduction. Like Lightroom, holding the Option key will show you a Sharpening mask. PhotoDirector 365 also includes a ‘show affected areas’ mask button. These help you see the changes. Quietly sitting in the Detail panel is a Denoise AI tool. This automatically removes noise from your image, a feature absent from Lightroom. When using the denoise sliders, the results are similar to Lightroom denoise. But neither program competes with dedicated denoise programs like Topaz DeNoise. The Keystone panel adjusts the geometry of an image. The adjustments are very basic. You can adjust only 2 dimensions of an image. Lightroom allows you to control 6. PhotoDirector 365 also does not have an auto-straighten feature. At least, it is not in the adjustment panel. There are more powerful transform tools included in the Edit module. The number of lenses supported in the Lens Correction panel is limited. For our test images, PhotoDirector 365 correctly identified the camera manufacture. But it did not provide quite the right lens. You can request notification when correction for a specific lens becomes available. But the lens in question is older and unlikely to be the subject of an upgrade. More alarming was that the program did not recognise images taken with an iPhone 11.
Adjustment Module vs Develop Module
The PhotoDirector 365 Adjustment module and Lightroom’s Develop module look and feel similar. Each program has unique tools. Lightroom includes adjustments for texture, vignetting, and grain. Lightroom also has a calibration panel. PhotoDirector 365 has an extra selection tool and AI color enhancements. PhotoDirector 365 also includes an HDR effect panel and an auto-denoise option. Both programs are non-destructive. At any point, you can go back in the photo editing history or reset and start editing from scratch. The history panel in Lightroom is easy to find. The history panel in PhotoDirector 365 was more difficult to access. (Click on the View History icon below the image to open a pop-out history window. Cancel or apply a change to close the window and return to editing.) Clicking the auto tone option shows what each program thinks needs fixing in an image. Lightroom and PhotoDirector 365 gave different results. PhotoDirector 365 brightened the picture. Lightroom darkened it. Lightroom did more with contrast, shadows, whites, and blacks. Lightroom also added a bit of vibrance. But when manually adjusting the settings in both programs, the results were the same. Compare the PhotoDirector result on the left with the Lightroom result on the right.
PhotoDirector 365 vs Lightroom Verdict – Tie
Both Lightroom and PhotoDirector 365 give you the tools you need to organize your images. PhotoDirector 365 lets you manage your photos and make the basic adjustments to an image. It is easy to use, and the resulting quality looks similar to Lightroom. Each program has a few tools the other does not have. But for the most part, the programs are identical. But we are not done looking at PhotoDirector 365. There are two additional modules to consider that go beyond the capabilities of Lightroom.
Guided Module
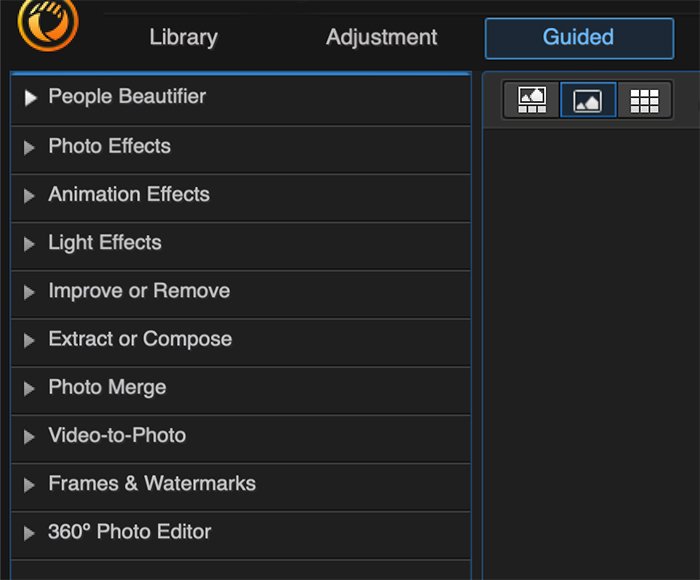
The Guided module is where PhotoDirector shines. This section is like some of the creative tools in Luminar AI and the effects in ON1 Photo Raw. These are tools for enhancing your image beyond anything Lightroom can do. You can add blur and bokeh. Or you can try overlaying textures and adding a lightrays effect. Many of these effects could be created in Photoshop. But you would need extra know-how and time. Selecting the Guided module opens a new set of panels. These include People Beautifier, Photo Effects, and Animation. But there are many more choices.
Photo Effects
Photo Effects include a new Sky searchment tool and AI Style Transfer. Apply the sky replacement effect with one click. You can blend foreground and sky colors. You can also change the focus in the new sky to match distant blur if it occurs in the foreground. The AI sky selection does well when the sky and foreground are well separated. You have a Brush tool in the Sky searchment panel to clean up the sky if the AI is imperfect. In a separate review, we compared the PhotoDirector 365’s sky replacement with other programs like Photoshop. The results were competitive. AI Style Transfer is unique to PhotoDirector 365. It adds a painterly effect to your image. There are many loaded styles, and you can get more in the CyberLink store. You can selectively apply Style Transfer to the background. And you can limit the effect on the subject.
Animation Effects
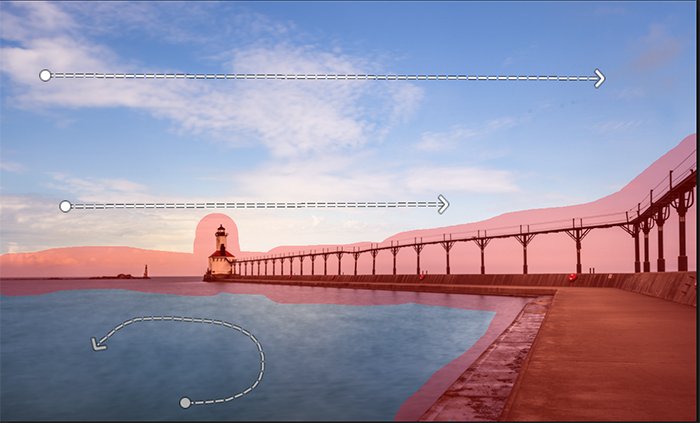
Animation Effects sets PhotoDirector 365 apart from other photo editing programs. The animation effects started life on the mobile app. But they were so popular, CyberLink added animation to their desktop photo editors. There is a specific Photo Animation effect. But keep an eye out for the Enable Animation Effect checkbox. This is only available in some of the effects. But when it is available, you can animate your images with one click. Make clouds float across the sky. Have lens flares glitter in the frame. Plus, you can add music to all animations. The program comes with background music. Or you can use music available through Shutterstock. The Beat effect animates motion to the beat of the music. You can control the size and duration of the movement. The files save as MP4 or GIF. But when exporting, the colors changed.
Other Effects
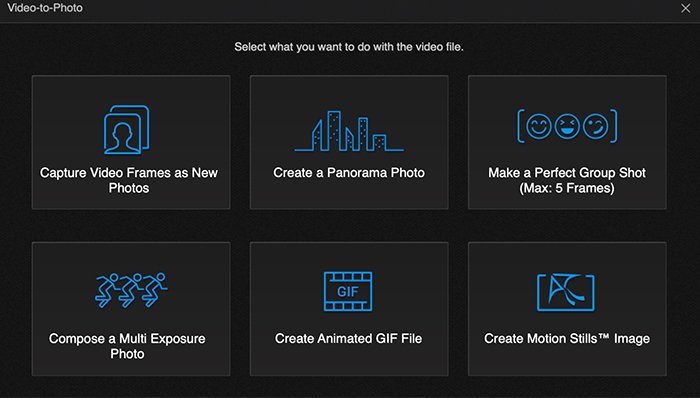
There are dozens of other effects. The effects are easy to apply with one click. Each effect has its own panel of adjustments. And you have control over how the effect looks in your image. People Beautifier includes body adjustments like the Liquify filter in Photoshop. You can merge bracketed images or add lighting effects like sun flares. There is even a 360-degree photo editor. The Deblur tool is a nice piece of AI. It will not fix all focus problems. But it will clean up slight motion blur. We have not even talked about the video-to-photo options. Take a still from a video. Create panoramas or animated GIFs from a video or multiple frames. Swap faces in a group photo. The list goes on. Creative use of video is not a surprise. CyberLink is a company that specialises in video editing software. Effects in the Guided module alone are worth the price of the program. There are dozens of effects to explore, and all are easy to use.
Create Module
The Create module is an earlier version of the Guided module. Here, you can create animated GIFs, Slideshows, and Motion Stills.
Edit Module
The Edit module is for more advanced image editing. It is PhotoDirector 365’s answer to Photoshop. Selecting the Edit module brings up a different workspace. The tool icons appear in a Photoshop-like toolbar down the right side of the screen. Selecting a tool brings up a set of options just to the left of the toolbar. The left-hand column simulates the layers panel in Photoshop, complete with blending modes. The Edit module contains Distortion tools. These options make up for the more limited geometry adjustments in the Adjustment module. Also, you can add text or clipart. The Brush and Selection tools will feel familiar to Photoshop users. As mentioned earlier, you can search and add stock photography from Shutterstock and iStock. Photographers may scratch their heads and wonder why this is a thing. For clients using PhotoDirector 365 for design, this is a valuable feature. You can search for and download stock photos without leaving the program. The image is added to a layer, ready for editing. Express layer templates in the Edit module further appeal to designers. This helps them compete with sites like Canva. Adjustments and guided tools are accessible directly from the Edit module. Click the Adjustment icon, and a window reminiscent of Adobe Camera Raw pops up. Click the magic wand icon to show a list of guided effects. Not all adjustments or effects are available, but many are, including sky replacement. Unfortunately, animation effects are largely missing. You must add animation either in the Guided module or in Create. Applying an effect in the Edit module adds it as a layer. You can use a layer mask to limit its impact on your image. You can also add multiple effects and change the blending modes and opacity of each. So, the Edit module works like a slimmed-down Photoshop. It would be easy for you to make this workspace their home base. They would have to leave the Edit module only to add animation or for more advanced adjustment tools.
Price and Subscription Options for PhotoDirector 365
CyberLink has created many different products. PhotoDirector is the company’s photo editing tool. PowerDirector is for video editing. The Director Suite includes both. But this latter option is not available to Mac users. The Mac version of PhotoDirector 365 has improved with recent uploads. But the video editing software remains more limited than the Windows version. The company offers a variety of subscription and perpetual license options for their Windows software. The Mac version has been upgraded but still lags behind the Windows version of the program. Mac users have only one subscription option. With the subscription, you get program updates as they are released. You also get new features monthly like layer packs, fonts, and templates. You will also have access to the DirectorZone Community. Unfortunately, the Mac subscription does not currently include cloud storage. But even without cloud storage, the subscription is a deal. The price is now less than half the cost of Adobe’s photography subscription. For this price, you get a program that goes beyond both Lightroom and Photoshop combined. If you want to try the program, there is a free 30-day trial. If you decide to buy a subscription, you will have to download the program again. There is no ‘upgrade’ option. I found the process a little confusing. In the end, I deleted the original program and re-installed it from scratch.
Conclusion
PhotoDirector 365 is a flexible photo editor. You can choose to make basic adjustments in a Lightroom-like workspace. Or you can work with layers like in Photoshop. There is a lot of redundancy in this program. It feels like a house that has been added to over the years with loft extensions and extra levels. It sprawls a bit. But you have options. You can navigate the program in different ways and find your favourite spaces. Overall, the program worked smoothly. If you are looking for a post-processing program, the power of PhotoDirector 365 is enormous. But there were a few little problematic things. The video help icons did not work. And we had difficulty signing into the DirectorZone community. PhotoDirector 365 is a less expensive alternative to Lightroom. It has all the editing features you need and many fun effects to explore. This is CyberLink’s push to include Mac users. And they have developed an attractive software option for creatives.
Our Verdict